As you know by now, I love testing new products that enhance the functionality of Skype for Business. When I find something that stands out, I like to share it with the community.
This review is unique in that it is actually for two products that work together to form a great solution.
Background
If you use Skype for Business, you'll know that it is simple and easy to change your own status, welcome note, forwarding and no answer call flows.Skype for Business status is something that can change a hundred times throughout the day especially if you have Exchange integration.
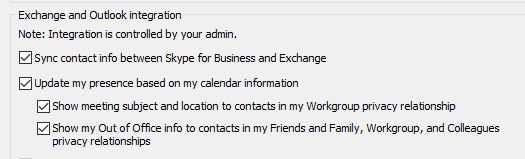
When you add a meeting to your calendar and you choose to show you as Busy...

...Skype for Business uses this and sets your status to Busy for the duration of the meeting. Once the meeting is finished, your status switches back to Available automatically.
When you're in a call, Skype for Business shows you as, you guessed it, "In a call". When you hang up it resets to what it was before you answered the call.
If you're using Skype for Business for telephony, you also have the ability to configure call forwarding options.

You can set up simple forwarding for all of your calls or set simultaneous ringing to call your mobile as well as your Skype for Business client.
With Team Call Groups, you can also set up a simple personal ring group to handle calls when you're unavailable.

With Delegates, you can set up a Boss/Admin function where a PA or secretary can answer calls for their bosses phone and even make calls for their boss.
Then once you've configured your other numbers and Team Call Groups, you have a simple panel to enable and disable things with a couple of clicks.

You can even change forwarding and simulring on the go using the Skype for Business mobile client.

It's all very simple and easy to use. As long as you remember to use it.
What do you do when you forgot to change your forwarding options and now you're out of the office with no access to a PC or smart phone? Do you call a colleague, hand out your password and get them to log in as you and change your settings? Probably not without upsetting the GDPR police.
So what now?
Microsoft made a tool which allowed admins to make some of these changes. It runs from the command line on a trusted app server which is integrated with Skype for Business. This is, of course, the Secondary Extension Feature Activation Utility, SEFAUtil for short. SEFAUtil is part of the Resource kit. It was built on UCMA3 and allows admins to manage users' call forwarding settings. An admin with the right permissions coudl turn on and off call forwarding and simulring, modify delegate and team call groups and set no answer times all from the command line.It hasn't change much, if at all, since Lync 2010 days when it was first launched and most people hate it. Admins still use it because it's there and free of course. Over the years I have seen people write GUI's for it and even use it as the basis for other tools like the Call Pickup Group Manager from MVP James Cussen (@MySkypeLab). SEFAUtil was necessary as a back end for the tool early on, however that changed with Skype for Business CU1 and now the tool uses the SfB PowerShell scripts as the back end.
Enter the alternative.
The new alternative is called SEFAUtil Server. This started as a community project for Office Servers and Services MVP Matt Landis (@matthewlandis) and was originally called SDR which stood for SEFAUtil Done Right.SEFAUtil Server is available for download from the TechNet Gallery. Until recently, this was available as a community edition which enabled a small subset of features for an unlimited number of users as well as an enterprise edition which enabled the rest of the features.
Landis recently announced some changes to the licensing. The original feature limited Community Edition has now been replaced by a new community edition which has all of the features of the enterprise edition for installations with less than 50 users.

SEFAUtil Server gets installed as a trusted app in a similar manner to SEFAUtil from the ResKit. MVP Greig Sheridan (@greiginsydney) has a great post here with the installation instructions.
SEFAUtil Server is basically a refreshed version of the old SEFAUtil with a ton of additional features. Since this review is about using SEFAUtil Server as the back end to Remeo, I'll leave it there. I'll write a separate review of SEFAUtil Server soon.
On with the show!
The review: Remeo with SEFAUtil Server
What is it?
Remeo is a product from Colima that allows users to change the reachability settings for other users using the Skype for Business 2015 client.
Remeo is a client application which is backed by the features of SEFAUtil Server. It installs as an add-on to the standard Skype for Business client to add additional menu items to the client as well as a CWE based UI for reading and changing the settings.
Why do you need it?
Remeo is for companies that want to be able to delegate permissions to change forwarding, simulring, team call groups and delegates, contact lists, presence and more to users that aren't administrators. This could include managers, supervisors, team leaders, personal assistants and office managers, among others.
Now you have it
Delegating these controls to users means that they don't have to make these requests of the administrators. It also means that non-admin users don't have to log on to the Trusted App server where SEFAUtil or SEFAUtil Server is installed and try to get familiar with the command line or PowerShell.
Although I'll admit that would be fun to watch.
To use it, you'll need to install SEFAUtil Server on a trusted app server and the Remeo client on computers of users that you want to grant the permissions to. Then you tell the Remeo client to use SEFAUtil Server as the back end, and it works straight away.
What can it do?
For starters, you can use the Remeo client as a "skin" to the forwarding settings already in your Skype for Business client. While this isn't strictly necessary since you can just change your settings in the normal way, it is pretty cool.

Click on the menu gear icon -> tools -> Call Forwarding Settings
This opens the call forwarding window for your user account.

What you get is a graphical representation of how calls will flow to you. With call forwarding turned off, you can adjust the timeout for calls that you don't answer.

You can change the target from voicemail to a number or a contact.

Clicking on number opens the form to add the number to send your calls to.

Clicking on contact, opens a search and select box with a list of your contacts to choose from.

When you turn call forwarding on, however, you get some additional settings. You can choose from forward my calls and simultaneous ring.

In forwarding, you can choose delegates, number or contacts.

In Simulring, you can choose delegates, team call group and number.

When you choose number it opens the same number form.
If you choose delegates or Team it opens the delegate and team call group form.

Here you can configure delegates and team call groups in the same form, which is really cool, along with the timer for ringing the group.
Here's an example of a simulring. It shows that calls ring you for 5 seconds before ringing the team call group, then after 20 seconds, go to voicemail. You'll see that the team call group also shows the members.

While using Remeo for changing forward settings for yourself is cool, the real point of Remeo is to allow one to change settings for someone else.
From the Skype for Business client, simply right click on a user and you'll see a new menu item in the list. Change Reachability Settings.

This opens the Reachability form for the selected user.

The form itself is similar to the forward settings form for your own account with one addition. This is the ability to change the personal note for the user.
I won't go through the options for changing the settings again because everything else is exactly the same as with the forward settings for your own account.
Suffice it to say that it just works. I had the client open on another PC, logged in with the account I was changing settings for and the changes were more or less instant.
I also thought it would be worth mentioning permissions, because I know someone will ask. You can control who has access to change permissions using Role Based Access Control (RBAC) in Active Directory. Click here for more info.
There are three ways to grant permissions to users:
- Users who are in the same Remeo AD-group(s)
- Users who are in a Skype for Business Delegation relationship
- Users who are in the same Skype for Business Team-call group
Is it any good?
As I said above, it just works. SEFAUtil Server took just a few minutes to install and register as a Trusted App Endpoint on an existing Trusted App Server. The Remeo client installs in seconds. Once installed and assuming you have the correct permissions, you can start changing settings for your team, your boss or the entire company.
What's wrong with it?
I haven't found anything.
What would I change?
The only thing I would like to see in the client interface is an apply button which doesn't close the form. This would give you the ability to make a single change, and apply it before moving on to make more changes.
I'd also love to see the ability to use the Remeo client to sign other users in and out of Response Group Service agent groups. This would be good on an individual basis and great if it could be done for multiple users at once.
Verdict
I'm sure you've guessed by now that I think the tool is fantastic. It's a great addition to the list of Pro tools for Skype for Business Server and something I know people want.
As I said, the ability to use it to change your own settings in a single screen is cool, but unnecessary. The real power is that users can change settings for others in your company.
More Information
- Link to the Remeo Product page - http://www.colima-remeo.com/#en
- Link to the Remeo Download page - https://colima.de/en/downloads
- Link to the Remeo Support page - http://remeo.support.colima.de/en/support/solutions
- Link to a video demo of Remeo in action - https://vimeo.com/220444593
- Link to the SEFAUtil Server Product Page - https://www.landiscomputer.com/sefautilserver/
- Link to the SEFAUtil Server User Manual - http://downloads.landiscomputer.com/sefautilserver/SEFAUtil-Server-Manual-en.pdf
___________________________________________________
Thanks for reading.Now you have it
Delegating these controls to users means that they don't have to make these requests of the administrators. It also means that non-admin users don't have to log on to the Trusted App server where SEFAUtil or SEFAUtil Server is installed and try to get familiar with the command line or PowerShell.
Although I'll admit that would be fun to watch.
To use it, you'll need to install SEFAUtil Server on a trusted app server and the Remeo client on computers of users that you want to grant the permissions to. Then you tell the Remeo client to use SEFAUtil Server as the back end, and it works straight away.
To use it, you'll need to install SEFAUtil Server on a trusted app server and the Remeo client on computers of users that you want to grant the permissions to. Then you tell the Remeo client to use SEFAUtil Server as the back end, and it works straight away.
What can it do?


While using Remeo for changing forward settings for yourself is cool, the real point of Remeo is to allow one to change settings for someone else.
From the Skype for Business client, simply right click on a user and you'll see a new menu item in the list. Change Reachability Settings.

This opens the Reachability form for the selected user.

The form itself is similar to the forward settings form for your own account with one addition. This is the ability to change the personal note for the user.
I won't go through the options for changing the settings again because everything else is exactly the same as with the forward settings for your own account.
Suffice it to say that it just works. I had the client open on another PC, logged in with the account I was changing settings for and the changes were more or less instant.
I also thought it would be worth mentioning permissions, because I know someone will ask. You can control who has access to change permissions using Role Based Access Control (RBAC) in Active Directory. Click here for more info.
There are three ways to grant permissions to users:
- Users who are in the same Remeo AD-group(s)
- Users who are in a Skype for Business Delegation relationship
- Users who are in the same Skype for Business Team-call group
Is it any good?
What's wrong with it?
What would I change?
I'd also love to see the ability to use the Remeo client to sign other users in and out of Response Group Service agent groups. This would be good on an individual basis and great if it could be done for multiple users at once.
Verdict
As I said, the ability to use it to change your own settings in a single screen is cool, but unnecessary. The real power is that users can change settings for others in your company.
More Information
- Link to the Remeo Product page - http://www.colima-remeo.com/#en
- Link to the Remeo Download page - https://colima.de/en/downloads
- Link to the Remeo Support page - http://remeo.support.colima.de/en/support/solutions
- Link to a video demo of Remeo in action - https://vimeo.com/220444593
- Link to the SEFAUtil Server Product Page - https://www.landiscomputer.com/sefautilserver/
- Link to the SEFAUtil Server User Manual - http://downloads.landiscomputer.com/sefautilserver/SEFAUtil-Server-Manual-en.pdf
___________________________________________________
If this or any other post has been useful to you please take a moment to share. Comments are welcome.


