Recently Kemp Technologies announced a free version of its hugely popular Virtual LoadMaster which can be downloaded from freeloadbalancer.com. What it gives you is a VLM that is only limited by throughput at just 20 Mbps, and lack of Kemp Support. Kemp says it is for lab's, development, testing, and proof of concept, however I think SMBs will definitely be taking them up on this, at least temporarily. I think this is a stroke of genius by someone at Kemp to get more people on board the Kemp train.
I spread the word on social media and got a huge response. I can only imagine Kemp did as well as the news probably went viral. At the same time I heard that Kemp also give a complimentary NFR copy of LoadMaster VLM-2000 for personal and non-commercial use to Microsoft Certified Professionals.
Just to set the scene, before hearing about the free version of the VLM I was acutely aware that Kemp was a popular choice for Reverse Proxy and "Hardware" Load Balancer for Lync. It is something that I have been meaning to try out but never quite got around to it. The news of free perpetual licenses was just the motivation I needed.
Why do we need one?
I'll start by giving a high level overview of the need for both Reverse Proxy and Hardware Load Balancers for Lync.
First there is the Reverse Proxy.
The Reverse Proxy provides an extra layer of security between the internet and the Lync Front End pool. The Lync Front End servers host some internal and external facing websites in IIS such as the meeting space (meet.domain.com). The internal sites listen and respond to requests on standard HTTP/HTTPS ports 80 and 443. The external sites listen on 8080 and 4443 so they don't conflict with the internal websites. Since most firewalls do not allow for 8080 and 4443 out or in to a corporate network it is necessary to do port address translation (PAT) to convert 80 to 8080 and 443 to 4443.

Figure 1: HTTP Reverse Proxy using PAT
In addition to the function to translate the ports it is also necessary to load balance the traffic when there are multiple Front End servers in a pool. Adding multiple Front End servers behind the Reverse Proxy adds high availability to the HTTP traffic. Thus ensuring that there is always a Front End to service the request. Adding to that a distribution method known as least connection ensures that the requests are evenly spread between the Front End servers at all times. Least connection means that the next connection request is sent to the Front End with the fewest number of active sessions.

Figure 2: Load balancing Reverse Proxy using PAT and Least Connection
The role of a Hardware Load Balancer in a Lync topology is partly to do with spreading the load evenly among a pool of servers...

Figure 3: Load balanced HTTP

Figure 4: Super HTTP Persistence
What about DNS load balancing?
DNS load balancing works for SIP traffic but not for HTTP.
DNS load balancing works by assigning multiple server IP Addresses to the A record of the Lync Pool. The Lync client caches all of the IP Addresses for that DNS record.
Hardware load balancing by contrast, works by assigning a single IP to the Pool DNS record. The client sends requests to that IP and the load balancer decides which server to send the traffic to.
SIP, by its very nature, is persistent. Once the session is established it stays established until one party ends the session. The way I think of it is that SIP or Session Initiation Protocol is conversational. A SIP transaction starts by sending a request to start a conversation to one of the server IPs. The server reply could be a handshake and an invitation to continue the conversation or it could be a message saying that you should go next door and try there. Once the session is established it stays connected until it is finished.
HTTP, on the other hand, is not persistent, nor can it be. HTTP sessions terminate as soon as the request finishes. Yet with Lync, there is more to the HTTP transaction than the initial request. So the session needs to be reestablished to continue the transaction. If the client is then connected to a new server to reestablish the session, the new server won't know where the last server left off and where it should continue from. And the conversation stops. You need the hardware load balancer to ensure that the client reestablishes the session with the same server. You need the Hardware Load Balancer to maintain persistence.
On with the show...
My topology in brief
I have a 2012 R2 server Hyper-V host running a Domain Controller with DHCP, DNS and CA, Exchange 2013, SQL 2012 R2, a 3 server Lync Enterprise Pool, two Standard Edition Servers pool paired, an Office Web Apps server. Persistent Chat is deployed on one of the Standard Edition Front Ends. The SQL server hosts the Enterprise Pool CMS, Monitoring, Archiving and PChat Databases as well as SQL reporting services with the Lync Monitoring Reports.
Build your server
The process for downloading and installing your Kemp Virtual LoadMaster is well documented and the process depends on your hypervisor. Click HERE for a full list of installation guides.
I'll give you a quick run through of the process in Microsoft Hyper-V on Windows Server 2012 R2.
Firstly, you need to ensure your host server has the capacity to run the VLM virtual guest machine. As a minimum, the VLM virtual guest needs:
- 2 x Virtual Processors
- 2 GB RAM
- 32 GB Virtual Hard Drive
- 2 x Virtual NICs
First you need to download the Hyper-V files. For a trial download you can click here. Or for the free load balancer click here - freeloadbalancer.com/download.
At the time of writing the VLM server is running version Vers:7.1-24b(Hyper-V).
At the time of writing the VLM server is running version Vers:7.1-24b(Hyper-V).
Installing the VLM using Hyper-V Manager
Step 1 - Import the virtual machine
Click Import virtual machine

Which opens the Import virtual machine wizard.
Then click next

Step 2 - Locate folder
You would have unzipped the downloaded folder to your server.
- Browse and locate your virtual machine files.
- Then click next.

Step 3 - Select the Virtual Machine.
- Select the virtual machine from the list.
- Then click next.

Step 4 - Choose the import type
- Select "Copy the virtual machine (create a new unique ID)"
- Then click next

Step 5 - Configure your virtual machine options
- In Hyper-V Manager, right click on LoadMaster VLM and click Settings.
- Expand Network Adapter
- Click on Advanced Features
- Under MAC Address - Choose Static and tick Enable MAC Address Spoofing
- Repeat for the second Network Adapter
- Click OK

Step 6 - Start your server
Once the server is started connect to it from the console in Hyper-V manager
If a DHCP server is available in your environment the server will get an IP address automatically. The default IP is 192.168.1.110. The IP address will be displayed in the console session.

Configuration
If you need to statically assign an IP you can assign an IP through the console.
First log in with the username bal and the (default) password 1fourall
Choose quick setup and OK

Enter the Network Side IP. This is the IP on the perimeter of your DMZ (i.e. 172.150.15.230/24) and OK

Enter the Farm Side IP range. This is the IP Address Range of your Front End servers (i.e. 192.168.2.2/24) and OK
Now enter the DNS server IPs (separated by a space) and OK

Now enter the search domain (separated by a space) and OK

Now enter the default gateway of your Network Side range (i.e. 172.150.15.254/24) and OK

Now exit configuration and OK

Step 7 - Point your browser to the IP address you selected as the Network Side address - https://<IP Address> and enter your credentials when ready. Unless you changed them, use the default (see above)

Now you are ready to configure the LoadMaster
For detailed instructions for configuring the LoadMaster for all Lync 2013 services click here
General Configuration
First there are some general recommendations for a LoadMaster configured for Lync which are listed in section 3 in the link above. However I have added the details below.
Disable SNAT Globally
KEMP recommends disabling SNAT
globally when using the LoadMaster with a Lync 2013 environment.
Subnet Originating Requests
When deployed in a two-armed configuration KEMP recommends enabling Subnet Originating Requests.
When enabled, the LoadMaster uses its local IP
address instead of the IP address of the Virtual Service when
communicating to the Real Servers.
To configure the Network Options follow the steps below:

To configure the Network Options follow the steps below:
- In the main menu of the LoadMaster Web UI (WUI), select System Configuration > Miscellaneous Options > Network Options.
- Remove the check from the Enable Server NAT check box.
- Select the Subnet Originating Requests check box.
Change Drop Connection Settings
Enable drop connections on Real Server
Failure in order for clients to fail over to another Real
Server quickly.

- To configure dropping connections, click System Configuration.
- Click Miscellaneous Options.
- Click L7 Configuration.
- Select the Drop Connections on RS failure checkbox.
Increase Connection Timeout
Set the Connection Timeout to one day. The LoadMaster monitors client connections as well as servers. If a server fails during a connection, the LoadMaster can disconnect the client from the LoadMaster, then reconnect to the LoadMaster and, at the same time, connect to another Real Server.

Import Templates
- To configure the Connection Timeout, click System Configuration.
- Click Miscellaneous Options.
- Click L7 Configuration.
- Enter 86400 (1 day) in the L7 Connection Drain Time (secs) field and click Set Time.
Import Templates
Now that the general configuration is done you need to Download and Import the Lync 2013 Templates.
Expand Virtual Servers, Browse to the location of the templates you just downloaded and click Add New Template. When done your list should look like the below.

Certificates
You should hopefully have a public certificate to use for your reverse proxy. I usually recommend combining the Edge and Reverse Proxy certificate SANs onto a single public certificate. This has a couple of advantages. Firstly, you only have one certificate to request, order, purchase and renew. And the most important one is that you can use the Edge Server certificate request wizard to generate the request for your public certificate provider. All you need to do in the wizard is add the Subject Alternate Names you need for your Lync web services. Such as meet.domain.com, lyncdiscover, lyncweb etc.
Once the certificate has been issued from your provider you should get a certificate file and an intermediate file. You must save the certificate in a format which includes the public key. Otherwise the import will fail.
To import the certificate Expand Certificates and click on SSL Certificates.

Browse to the location of the certificate file and click save.

When the certificate has been imported you should repeat to import the intermediate. Once done you should have a similar screen to the below.

When the certificate has been imported you should repeat to import the intermediate. Once done you should have a similar screen to the below.
Network Configuration
Before you can add your virtual servers you must add the IP addresses and ranges that you can use for virtual servers. In my case I had separate VLANs for the perimeter and internal LANs. My firewall is set to NAT the public IPs to the IPs used for the virtual services. I simply tagged the virtual NIC in Hyper-V with the VLAN ID I needed on each Kemp interface.
UPDATE: If your Virtual Services (VIPs) are in the same range as the IP address you assigned to the Network side NIC (ETH0) there is nothing else to configure in networking.
If, however, you set your Hyper-V Nirtual NIC for Trunk mode and need Multiple VLANs on a single Kemp interface you can add VLANs and IP ranges to the Virtual Interfaces (as you will see below).
Add the VLANs
- Expand System Configuration
- Click on ETH1 (network side)
- Click VLAN Configuration
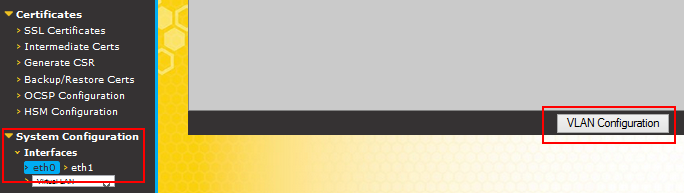
- Enter the VLAN ID and click Add New VLAN
When you add a VLAN it adds a virtual interface. You need to configure that interface and add the IP range of that VLAN.
- Click on ETH1, below is a dropdown of your virtual interfaces.
- Choose the interface you want to configure.
- On the right, enter the IP Address range and click Set Address.

Now it is time to add your virtual servers. Nearly done.
Add Virtual Services
Since you have already imported your certificates and have done all of the networking configuration the next bit will be quick.
Reverse Proxy
- Expand Virtual Services and click Add New
- In the Use Template drop down list choose Lync Reverse Proxy 2013
- Enter the IP address that your public IP will NAT to
- Change the port to 4443
- Click Add this virtual service

Repeat for Lync Internal 2013 HLB Only
- Enter the IP address of your internal web services VIP address
- Choose the template
- Click Add this virtual service

and Lync Office Web Apps Server 2013
- Enter the IP address that your public IP will NAT to
- Choose the template
- Change the port to 443
- Click Add this virtual service

Since you used the templates, this creates all of the necessary virtual IP Addresses and services complete with most of the configuration. Now you need to configure the certificate to use and add the Real Server IPs.
Click on View/Modify Services and you will see a list of your newly created virtual services.

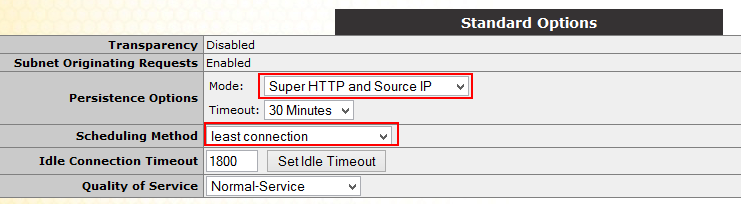
Choose the service you want to configure, such as Lync Reverse Proxy HTTPS and click Modify.

Expand Standard Options and make sure the Mode is set to Super HTTP and Source IP and the Scheduling Method is set to least connection.
Configure the Certificate
- Expand SSL Properties, choose your certificate in the list of available certificates
- Click the right arrow to add to the assigned certificates box
- Click Set Certificates

Add your Front End Servers
Expand Real Servers and click Add New
- Enter the IP of your first Front End
- change the port to 4443
- Click Add this real server
- Repeat for the rest of your Front End servers

Now modify Office Web Apps Servers

Configure the Certificate
- Expand SSL Properties, choose your certificate in the list of available certificates
- Click the right arrow to add to the assigned certificates box
- Click Set Certificates
Add your Office Web Apps Servers
Expand Real Servers and click Add New
- Enter the IP of your first Front End
- Leave the port set to 443
- Click Add this real server
- Repeat for the rest of your Office Web Apps servers

Now configure the rest of the services
The rest of the services in the list are created automatically since you chose the template.
You should have the following as a minimum:
- Lync Internal WebSvc HTTP
- Lync Internal Front-End DCOM
- Lync Internal WebSvc HTTPS HLB Only
- Lync Internal Front-End SIP
- Lync Reverse Proxy HTTPS
- Office Web App Servers
UPDATE: Internal Virtual Services
Since this is a two-armed configuration we have to cater for the internal Virtual Services. For instance the Internal Web Services HTTPS Hardware Load Balancer. Since the internal Virtual Services are on the internal LAN range and the internal NIC (ETH1) doesn't have a default gateway we need to configure a Service Based Default Gateway.
These are services such as:
- Lync Internal WebSvc HTTP
- Lync Internal Front-End DCOM
- Lync Internal WebSvc HTTPS HLB Only
- Lync Internal Front-End SIP
Click on View/Modify Services and you will see a list of your virtual services. Click on Modify next to one of the Internal Virtual Services to open the Properties page.

In the Properties page - Expand Advanced Properties
- Add the Default Gateway IP for the internal subnet
- Click Set Default Gateway
- Click Back to go back to your list of virtual services
- Repeat for the rest of your Internal Virtual Services

Now you need to add the Real Servers
Choose the service you want to configure and click Modify
Expand Real Servers and click Add New
- Enter the IP of your first Front End
- Leave the port as the default
- Click Add this real server
- Repeat for the rest of your Front End servers
If you did everything correctly, you services should display a status of Up. See below.
Test
Now you need to test that everything is working. For me, the basic test is simply to browse the Web Services URLs from inside and from outside of your network.
Here is a short list of the URLs I test
- Dial In Conferencing Settings URL - https://dialin.domain.com
- External Persistent Chat Room Management URL - https://lyncweb.domain.com/PersistentChat/RM/
- Internal Persistent Chat Room Management URL - https://lyncwebint.domain.com/PersistentChat/RM/
- External Web Scheduler URL - https://lyncweb.domain.com/Scheduler
- Internal Web Scheduler URL - https://lyncwebint.domain.com/Scheduler
- Office Web Apps discovery URL test - https://wac.domain.com/hosting/discovery/
- External AutoDiscover with WebTicketService -https://lyncweb.domain.com/WebTicket/WebTicketService.svc
- Meeting Space URL - https://meet.domain.com
- Internal AutoDiscover with WebTicketService -https://lyncwebint.domain.com/WebTicket/WebTicketService.svc
Assuming you have Mobility Enabled you can perform a basic test by using the Microsoft Connectivity Tester
- Choose Lync/OCS Server
- Under Microsoft Lync Tests choose Lync AutoDiscover Web Service Remote Connectivity Test and click Next.
- Enter the Verification Characters and click Verify
- Click Perform Test
With any luck it should look like the below

You also
want to make sure that you can log in from the Lync 2013 client on your
Smart Phone. And once you are logged in, test you have two way IM,
Audio, Video and screen sharing.
And finally, test Office Web Apps. Assuming you have remote access through your Edge server, log in to the Lync client from a remote PC. Click Meet Now and present a PowerPoint Presentation. If it succeeds, happy days.
Okay, this concludes this lesson on configuring the Kemp VLM as a Reverse Proxy and Hardware Load Balancer in Two Armed Mode.
I'd like to quickly point out that I had never configured one of these prior to setting this one up. I followed the Hyper-V setup guide and the MS Lync 2013 deployment Guide which got me so far. The Networking configuration was done with some trial and error, but I stopped once I got everything to work. I previously had an IIS ARR server in front of my lab topology and I replaced it with this VLM.
Call to Action: If any of you spot an error or a different/better way of doing something please share and I'll update it and give you credit. If you appreciate what I do please share.
Big thanks to Kemp Technologies for the complimentary Virtual LoadMaster. I would definitely highly recommend Kemp Virtual LoadMaster for its ease of use an d also because it just works.
For a full list of Kemp Virtual LoadMaster products visit their website.
Thanks for reading.